Boost your coding productivity with Emmet in VS Code

Finally the time of remembering the doctype syntax and tags are truly over. I am getting really crazy with Emmet from last few months and feel like to write about it. In this post I will describe what is Emmet and how it can help you to improve your coding productivity in VS Code.


First thing first – If you’re using VSCode, Emmet is actually built right in so you don’t even have to install it. For any specific code editor you can follow the installation guide

In simple words Emmet is a plugin for many text editors and it can help us to write out shorthand version of our markup to generate HTML, CSS.

Generating Basic HTML Structure
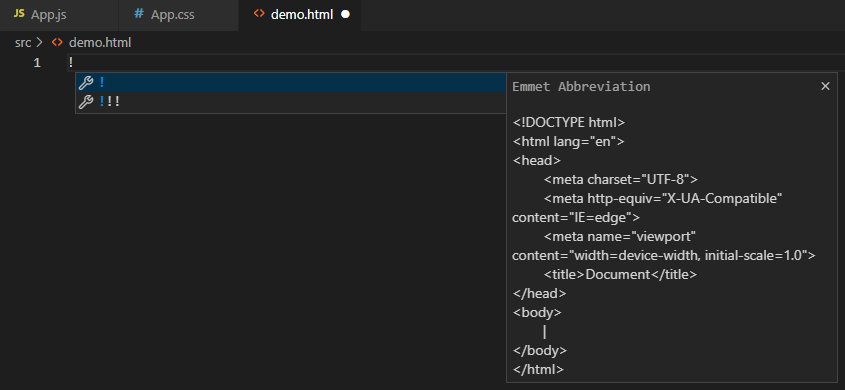
When we create an HTML page we first create a skeleton for it, that includes DOCTYPE, html, head, body etc. You can do all that with just 1 key. That’s the beauty of Emmet.

Let’s open a Visual Studio Code, create a html file and Just type ‘!’, press enter/ hit tab and you will have the basic HTML structure ready!!

Basic Tags with Classes and Id

To create basic HTML tags, just type the tag’s name and hit Enter. You can even add the classes and id to a tag. Emmet uses . for classes and # for id.

div#name.section

Element with text content and attributes
To show content within the tag, just wrap the content in curly braces { }

p{I am Kavita}

Emmet uses [] for attributes

img[src="beach.jpg"][alt="beach pic"]

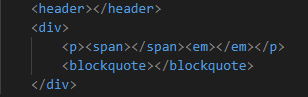
Parents, Siblings & Children
We can specify parents, siblings and children using the ^, + and > characters

header+div>p>span+em^bq


Grouping and Iterations
If your structure is very complex, you may want to group tags using parenthesis()

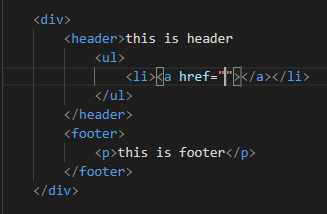
div>(header{this is header}>ul>li>a)+footer>p{this is footer}

To generate same tag multiple times we can use (*)
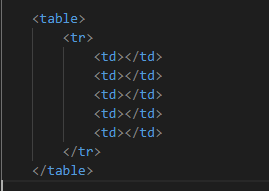
table>tr>td*5

We can add the sequence using $ and even customize the numbering using $$
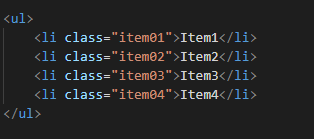
Pad with zerosul>li{Item$}.item$$*4

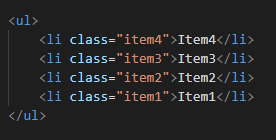
Reverse direction - ul>li{Item$@-}.item$@-*4

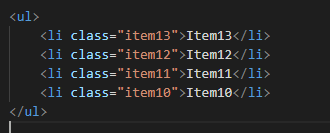
Reverse direction from a specific number - ul>li{Item$@-10}.item$@-10*4
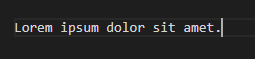
Lorem Ipsum

Let’s generate”Lorem Ipsum” dummy text. By default Emmet will generate 30 words of text or you can define the number of words as well.

lorem5

CSS
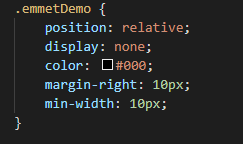
Emmet is very helpful for CSS as well. Now you don’t have to remember long property names, use short expressions to assign values to properties. Here are some examples.

pos - to set the position by default its relative
c - use color poperty
d:n - to set display attribute to none
mr:10 - for margin
miw:10 - setting the width

To see the full list of short expressions, please refer Emmet documentation

Emmet can boost your productivity when writing HTML and CSS. I think Emmet is Awesome, do you agree?

Create a Workflow with Microsoft Flow

In this demo I will show you, how to create a workflow with Microsoft Flow. I will use a business scenario where the employee apply for a leave in SharePoint List named “Team Calendar” and I as a project lead will get an email to approve or reject the request and based on my response list item will be updated with “Approve/Reject” option in ‘Status’ column.

So let’s get started –

  • First create a sample list “Team Calendar” with 5 columns (Employee Name (Renamed title), Start Date, End Date, Comment Box and Status).
  • Go to the list and click on ‘ Flow’ and then select ‘Create a Flow’.
  • Select the template “Send approval email when a new item is added”. Here Outlook will perform the action of sending an e-mail to the ME (as a Project Lead) and SharePoint will perform the action of updating the “Team Calendar” list. Click ‘Continue’ to proceed.
  • As this flow was created from SharePoint, the ‘Site url’ and ‘list name’ are filled out automatically.
  • Set the information of the user who will get a message when a leave request is submitted to a list. I will set my email address under the field ‘To’.
  • Change the ‘Approval request’ text in the ‘Subject’ field to ‘A new leave request has been submitted by’ and append the ‘Title’ (to have the Employee name in the email subject field).
  • Insert “Approve, Reject” under ‘User options’, so that any of them can be selected directly in the notification email.
  • Delete the condition, as there will be no condition for the email sending.
  • Select ‘New step’ and then ‘New action’ to select the action which will update the SharePoint item.
  • Since we are going to write back the approval decision to the SharePoint item, select the SharePoint action ‘SharePoint – Update item’.
  • Select the site URL in the field ‘Site Url’ and the “Team Calendar” list under the field ‘List name’
  • Select the field ‘ID’ from the dynamic content pop-up box as ‘Id’. This will be the ID from the initial trigger.
  • Select the field ‘Title’ from the dynamic content pop-up box ‘Title’.
  • In the ‘Status’ field, select ‘SelectedOption’ from the dynamic content box. This will be my response (as Project Lead) when I have selected the option.
  • Click on ‘Create Flow’.
  • Click on ‘Done’ to finalize the flow.

To test the flow, add an item in the ‘Team Calendar’ list and make sure an email is sent. Select an option in the email and make sure that the list item status column is updated.

Happy Learning!!

Working with Web Services in SharePoint Designer 2013 Workflow

In this post I will use “Call HTTP web service” action to get a collection of items from a list, and then will log the number of items with it’s title. 
Following is the sample SharePoint List “Call HTTP Webservice Online” I created for this Demo –

Now let’s create a Site workflow as I don’t need this workflow to be fired when items are created or modified in the list

I split this post into 4 different workflow stages: Initialization, Webservice Call, Webservice Response and Finished.

Stage 1: Initialization: 

The following variables get initialized at this stage:

  1. WebserviceURL workflow variable of type ‘string’
  2. Index workflow variable of type Integer & set it to 0. 
  3. Add a Dictionary variable (Build a Dictionary action), call it requestHeaders and initialize it with “Accept” and “Content-Type” entries are of the String type and they both contain the value “application/json;odata=verbose”.

Stage 2: Webservice Call

  1. Add a Call as HTTP Web Service action and set its properties.
  2. Set workflow variable “WebserviceURL” as Web Service URL and Set HTTP method as “GET“.
  3. Response content will go to a new variable called responseContent.(type – Dictionary).
  4. Response headers will go to a new variable called responseHeaders.(type – Dictionary).
  5. Response code will go to a new variable called responseCode.(type – Dictionary ).

Then we set the request headers to be the requestHeaders variable we created just now, by clicking on the properties for the Call on HTTP Web Service action:

Stage 3: Webservice Response

  1. Add a Get an Item from a Dictionary action, set the item as d/results, the source variable reponseContent and the output to a new variable of type Dictionary called List.
  2. Then count items from this list variable using a Count Items in Dictionary action and store the result in a new Integer variable called TotalListItem. This variable will tell us how many times we have to loop.
  3. Now, create a new Integer variable called index and set it to 0 (Set Workflow Variable), this will be the loop index
  4. Add a loop (Loop n Times), and set the loop variable to TotalListItem variable.
  • Inside the loop, get value d/results ([%Variable: index %]) using a Get an Item from a Dictionary action from responseContent and store it in a new Dictionary variable called CurrentItem.
  • Get some fields (Get an Item from a Dictionary) from the CurrentItem variable, such as Title and store them in appropriate variables and then perform any action, like logging its value
  • It’s time to increment the loop counter: add a Do Calculation action and in it increment the index variable into a new Integer variable called IncrementCounter.
  • Then set the index variable to be the IncrementCounter(Set Workflow Variable).

Stage 4: Finished

  1. Finally exit the loop and set the workflow status to Finished.
  2. At the end of the stage, select go to End of Workflow.

Let’s run the workflow –

  1. Go to site content
  2. Click Site Workflow
  3. Select Appropriate workflow
  4. Click it
  5. Workflow started.

Result –

I hope you find this post helpful 🙂

Overview of Microsoft Graph API

While working with Office 365, you might have come across this term so in this post I will describe what is “Microsoft Graph API “, In the simplest words Microsoft Graph is the easiest way to call the Microsoft APIs be it Users, Groups, Mail, Calendars, Contacts, Files etc. all from a single endpoint.

This was previously known as the Office 365 Unified API. It exposes multiple APIs from Microsoft Cloud Services through a single REST API endpoint (https://graph.microsoft.com ).

Prior to Microsoft Graph API, Microsoft had different APIs for it’s different Office 365 and cloud products which needs below steps while dealing with different Office 365 APIs in an application:

  • Find the endpoint of the API
  • Get the access token
  • Get results from the API
  • Repeat for each service
  • Manage multiple tokens for each API

So now understand if one had to connect to many different APIs in an application, it gets difficult to deal with it hence as a solution, Microsoft launched the Microsoft Graph API. Using Microsoft Graph, you just have to make a single endpoint call to the cloud services and require a single authentication token.

Microsoft Graph is a really powerful and easy way to call the Microsoft APIs and all from a single endpoint.

Visit  Microsoft Graph Home  &  Graph explorer to get more information about it.

Thanks!!!

Clear SharePoint Designer 2013 Cache

Sometimes SharePoint Designer 2013 gets confused. One way to get it back on track is to reset it’s cache. Clearing the cache will remove any of your past connection history as well provide you a “clean slate” to work from.  The cache is not even cleared after doing a reinstall, so this is the only way to clear it. SharePoint Designer has a little habit of caching files, including say the XML/XSLT, JS and CSS you might be working with on your site.

  1. Close SharePoint Designer if it is open
  2. Open Windows Explorer, Click the address bar and Paste “%USERPROFILE%\AppData\Local\Microsoft\WebsiteCache” and delete everything within this location.
  3. Open Windows Explorer, Click the address bar and Paste “%APPDATA%\Microsoft\Web Server Extensions\Cache” and delete everything in this location.
  4. Go to SPD2013 options –> General –> Application Options –> Uncheck the “Cache site data across SharePoint Designer sessions”

1

2

Relaunch SDP. Easy!

Character Count for Multi-line Text box in SharePoint List Forms

While working with SharePoint, you might have come across a scenarios where you need to count the character for Multi-line text-box in SharePoint list form. In this post I am going to implement Character Counter for Multi-line Text box using JQuery.

To outline the solution please follow the below steps –

Step 1 : Open your List new/edit form using SP Designer.

1

Step 2: Add tag under your multi line text filed description in the New form.

2

Step 3: Add the below code in your New form. and download Jquery latest file.

5

Step 4: Save the form and refresh your page.

4

Thank you. 🙂

Quick Search in SharePoint List Using JQuery

In this post I am going to implement a quick search in SharePoint list using JQuery that allows you to search records in a list. It is useful in a situation where you don’t have SharePoint Search setup and just need a simple way of performing search operations in a SharePoint List.

To outline the solution please follow the below steps –

  • Download the latest JQuery file from Here
  • Create a Custom SharePoint list in which you would like to implement the search
  • Open the SharePoint Designer
  • Go to All Files-> Lists->Select the name of the list we just created
  • Paste the JQuery file (jquery-min.js) we just downloaded
  • Create a new JavaScript File-> Rename the file as “QuickSearch.js”
  • Open “AllItem.aspx” view and add the reference of both the JQuery file

    <script type=”text/javascript” src=” QuickSearch.js”>

    <script type=”text/javascript” src=”jquery-min.js”>

  • Now Edit the “QuickSearch.js” file, type below code and Save the file

$(document).ready(function(){

$(“input.search”).change(function() {

     var txt = $(“input.search”).val();

     if (txt) {

              $(“#WebPartWPQ1”).find(“tr.ms-itmhover:not(:Contains(“+txt+”))”).hide();

               $(“#WebPartWPQ1”).find(“tr.ms-itmhover:Contains(“+txt+”)”).show();

                   } else {

                    $(“#WebPartWPQ1”).find(“tr.ms-itmhover”).show();

                  }

           }).keyup(function(){$(this).change();

     });

});

<div style=”padding: 5px; border: 1px solid #cccccc; width: 60%; margin: 10px auto 0pt; background: none repeat scroll 0% 0% #efefef; display: block;”>

<h3 style=”text-align: center;”>TYPE HERE : <input class=”search” style=”padding: 10px;” type=”text”/>

quicksearch2

Explanation : We would like to start our function anytime the search input text is changed. Once it’s changed, it sets the value of a variable we have called “txt”.

Here we have an IF statement that just checks if there is indeed something in the search box, ELSE everything goes back to normal. If there is something inside the search input box, we are going to do two things. First, we’ll find any row that does NOT contain the string, and we’ll hide that row. Then we’ll find any row that DOES contain that string, and we’ll show that row. Finally, we chain a “keyup” function to the change function so that as we type everything is happening all together.

And last but not least, we created a simple search input box with a class of “search”.

Now open the SharePoint List All Item view in internet explorer and If you have done everything correctly then it will filter the items on the basis of your inputs.

quicksearch

PS : You’ll have to change the target WebPart ID it’s searching in and replace it with your current Web Part ID and its row class.

I hope you find this post useful.

Add an Attachment Field in SharePoint 2013 List Form

There are many instances where your customer would like to have Attach file option in the form itself instead of OOB option available in ribbon.Below I will show you how to have the “Browse” and “Upload” features directly on the form.

Open up SharePoint Designer 2013 and navigate to your list. Then click on the ASPX file you would like to edit under the “Forms” section.

In the code view of the form, place the below code to insert the Attachment Field
<tr>
<td rowspan=”2″ width=”200px” valign=”top” height=”25px”>
<b>Upload Files: </b> </td>
<td valign=”bottom” height=”25″ id=”attachmentsOnClient”>
<span dir=”ltr”>
<input type=”file” name=”fileupload0″ id=”onetidIOFile”
size=”60″ title=”Name”></input>
</span>
</td></tr>
<tr>
<td >
<input id=”attachOKbutton” type=”BUTTON” onclick=’OkAttach()’
value=”Upload” />
<span id=”idSpace”></span></td></tr>

Now you can see the browse button to upload the files into SharePoint list item.

1

Thanks. !! 🙂

Disable browser back button functionality using JQuery

Sometime we have requirement in developing a website to disable the back button effect from browser. This is common in sites where security is of principal concern. Please note we cannot disable the browser back button functionality from users machine only thing that can be done is prevent them.

In the following example I am having one HTML page Disable.html and when user click on link (Visit Google Home Page), will be directed to Google Home page. but if the user tries to go back from Google page we will prevent the browser back button using JQuery.

<!doctype html>
<html>
<head title=”DisableBack”>
< script src=`https://ajax.googleapis.com/ajax/libs/jquery/1.11.3/jquery.min.js` >
< /script >
< script type=”text/javascript” >
$(document).ready(function () {
window.history.forward(1);
});
“< /script >”
</head>
<body>
<div>
< h1 > Disable Browser Back Button Functionality Using JQuery </ h1 >
< a href=`http://www.google.com/` > Visit Google Home Page < /a >

< /div >
< /body >
< /html >

The above highlighted function in the HTML page uses the history of the browser and forces it to navigate forward instead of going to the previous page. Therefore, every time the user clicks the back button or hits the backspace key, it will result in the browser navigating or pushing the user forward and showing the same Google home page.

1

You may want to warn user if back button is pressed so that user doesn’t lose their unsaved data then please add the following snippets in script tag of the page.

$(window).bind(“beforeunload”, function () {

return “Back button has disabled for this form”;

});


2

Thanks!! 🙂 🙂