Form Validation in AngularJS using ngMessages

One of the great advantages of AngularJS is the form validation. By decorating the fields with the correct attributes, angular validation will occur automatically and let you know when a field is valid or invalid. In addition we can also use some conditional CSS classes to highlight invalid fields to the user.

The ngMessages directive was added with the release of Angular 1.3 to display the error messages. Before the 1.3 release, we were forced to rely on directives such as ng-class and ng-show. That resulted in messy, tedius code.

Let’s create a simple application to demonstrate ngMessages in practice, please follow the steps below-

  1. Create an HTML page, add the reference of AngularJS libraries and then Load the module
  2. Add some input fields (User Name, User Email ID) and submit button on the Form
  3. Add required attributes to both the input fields to make it compulsory, as well as use an ng-model directive to bind them to properties on the current scope
  4. Now pass name of the form, chained to the name attribute of the respective form field, chained to the $error object to ng-messages directives
  5. Once that is done, you just need to nest a div containing an ng-message attribute inside of the ngMessages div. The value passed to the ng-message attribute will depend upon the directives we added to the input field, in this case the value will be required, minlength, maxlength and email.

Validation.html

<!DOCTYPE html>

<html>

<head>

<meta charset=”utf-8″>

<title>ngMessages Demo</title>

<!– Add CSS File –>

<link rel=”stylesheet” href=”MyCSS.css”>

<!– Include AngularJS Library–>

<script src=”http:\\code.angularjs.org\1.4.0\angular.js”></script>

<script src=”http:\\ajax.googleapis.com\ajax\libs\angularjs\1.4.0\angular-messages.js”></script>

<script>

angular.module(‘app’, [‘ngMessages’]).controller(‘MyCtrl’, MyCtrl);

function MyCtrl() {

}

</script>

</head>

<body class=”container” ng-app=”app” ng-controller=”MyCtrl as My”>

<div class=”well text-center”>

<h2>Form Validation with ngMessages in AngularJS</h2>

</div>

<!– Create a form with two input fields “User Name” and “User EMail ID”–>

<form name=”userForm” novalidate>

<div class=”form-group” ng-class=”{ ‘has-error’: userForm.name.$touched && userForm.name.$invalid }”>

<label>User Name</label>

<input type=”text” name=”name” class=”form-control”

ng-model=”My.name”

ng-minlength=”5″

ng-maxlength=”10″

required>

<!– Pass the <name of the form>.<name attribute of form field>.$error to ng-messages directives–>

<div class=”help-block” ng-messages=”userForm.name.$error” ng-if=”userForm.name.$touched”>

<p ng-message=”minlength”>Your name is too short.</p>

<p ng-message=”maxlength”>Your name is too long.</p>

<p ng-message=”required”>Your name is required.</p>

</div>

</div>

<div class=”form-group” ng-class=”{ ‘has-error’: userForm.email.$touched && userForm.email.$invalid }”>

<label>User Email ID</label>

<input type=”email” name=”email” class=”form-control”

ng-model=”My.email”

ng-minlength=”5″

ng-maxlength=”20″

required>

<div class=”help-block” ng-messages=”userForm.email.$error” ng-if=”userForm.email.$touched”>

<p ng-message=”required”>This field is required</p>

<p ng-message=”minlength”>This field is too short</p>

<p ng-message=”maxlength”>This field is too long</p>

<p ng-message=”email”>This needs to be a valid email</p>

</div>

</div>

<div class=”form-group”>

<button type=”submit” class=”btn btn-danger”>Submit</button>

</div>

</form>

</body>

</html>

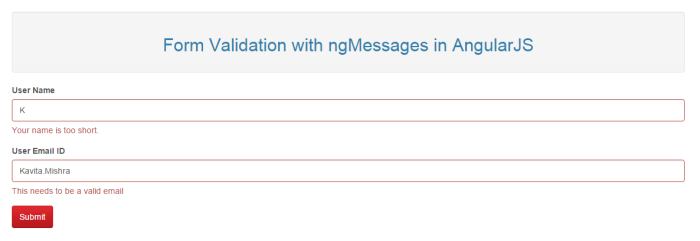
If you have done everything correctly then your form will show the validation error on the basis of your inputs.

12.1

Thank you for taking the time to read the blog. 🙂

Promoted Results in SharePoint 2013/Office 365

In this post I will write about how to create promoted results in SP 2013/Office 365. In SharePoint 2010 we had best bets to promote a result to the top of the search result list by using keywords. this was the great way to highlight a specific item in the result list. Best bets in Share Point 2010 is changed to promoted results in SharePoint 2013/Office 365.

To create Promoted Results, First open SharePoint Admin Center, click on Search from the left navigation and then click on “Manage Query Rules” link

1

In Manage Query Rules window, select Local SharePoint Result from the drop down of context and click on New Query Rule

2

3

On the Add New Query Rule page, Enter the Rule name and on the Context section select “Query Matched Keyword Exactly, enter keywords in the text box separated by semicolon. For e.g. Kavita;Mishra

4

Click on the “Add Promoted Results” link under Actions section and enter Title,  URL and description and then hit Save button

5

6

After completion of above details, click “Save” to save the Query Rule.

7

Now go to the search center. Type the word “Vision” or  “Policies”. The Company.docx would be displayed on top of the results with a tick mark

8

:):)

Create a Tabbed View in SharePoint 2013 using JQuery

While working with SharePoint, you might have come across a scenarios where you need to use the Tabbed View. In this post, I will share how to create a tabbed view for Multiple List Views in SharePoint 2013 (assuming that you have some SharePoint background) –

Step 1 : Create a Document Library (TabFiles) to store the required Jquery files

10.1

2. Upload below mention  js/css files in the Document Library (You can download these files from Here ).

  • jquery-ui.min.js
  • jquery-1.11.3.min.js
  • jquery-ui.min.css

10.2


3. Now create the Custom list (Employee Details) to implement the Tabbed view –

10.3


4. Add some columns (Employee ID, Employee Name, Designation and Address) and then items in the list –

10.5

5. Create the first list view as “Vice President” –

10.6

10.7


6. Filter the View on the basis of Designation as “Vice President” –

10.8

7. Now create three more views (for Manager, Team Lead and Software Engineer) designation same as we just created for “Vice President” (Change the name of the view and filter value to Manager/Team Lead/Software Engineer).

10.9

8. After Creating all the four views, Open site in SharePoint Designer.

10.11

9. Open “Employee Details” Custom list AllItem.aspx page in Advanced mode-

10.12

10. Add the reference of js and css file (Which we have already uploaded in the “TabFiles” Document Library) –

10.13

11. Add four Div Section (Vice President/Manager/Team Lead/ Software Engineer) for List Views

10.14

12. Open the List view file (VicePresident.aspx) in SharePoint Designer which we have just created and Cut the “WebpartZone” section and Paste it under “VP” Div section on AllItem.aspx page.

10.19

10.15

10.16


13. Change the WebpartZone ID to Unique name on the page-

10.17

14. Follow the same for remaining three views Manager/Team Lead/Software Engineer –

  • Cut The WebPartZone code from List View Page (Manager.aspx/ TeamLead.aspx/  SoftwareEngineer.aspx)
  • Paste it under each Div Section on AllItem.aspx page
  • Change the WebPartZone ID to Unique Name and save all the pages

10.19

15. Now open the Employee Details List in internet explorer and you will see the Employee Details List AllItem View has Converted into Tabbed view 🙂

10.18

I hope you liked it, Thanks for reading the blog 🙂

Create an App Catalog in SharePoint 2013 online

In this post, I’ll describe about creating an App catalog in SharePoint 2013 online, before diving into the details, I would like to give you a brief introduction about App Catalog.

The App Catalog is a special site collection on a web application that holds the apps, each web application can have only one App Catalog site collection whereas there can be multiple App Catalogs in a farm.

You can create the App Catalog site collection from SharePoint Central Administration or from Admin site in Office 365. I am using Office 365 for this example but the steps would be almost same.

1. Go to the Admin site in the Office 365 and Click on “SharePoint” link under Admin section

0

1

2. Click on “Apps” at left navigation

3

3. Select Create a new catalog site and then click on Ok.

4

4. Enter the details of the new app catalog site and then click on “OK”

5

5. An App Catalog site collection is created successfully.

6

By default the following document libraries will be available in the App Catalog site

  • Apps for SharePoint : A library where Apps that can be use in SharePoint stays
  • Apps for Office : This library is use to store the apps for Office
  • App Requests : Users who do not have access to add an App, can add a new App Request for Admins to get the permission for the app. 

I hope you find this blog helpful 🙂

Microsoft pushed SharePoint 2016 release in Q2 2016

For those of you who have been waiting for the release of SharePoint 2016, the wait has just became a little longer, Microsoft has delayed the release of SharePoint server 2016 to second calendar quarter of 2016 (Q2 2016). This may be the first time Microsoft has pushed SharePoint release. But on April 16 announcement made by Seth Patton, senior director of product management for the SharePoint team. He confirmed that SharePoint Server 2016 will be available in Q2-2016 instead of 2015 and the first public beta version of SharePoint Server 2016 will be available in fourth calendar quarter of 2015 (Q4 2015).

SharePoint Server 2016 will deliver enhancements and new capabilities in three major areas:

  • Improved user experiences
  • Cloud-inspired infrastructure
  • Compliance and reporting

SP2016


Please check the below URL for the whole article

https://blogs.office.com/2015/04/16/sharepoint-server-2016-update/


If you would like to participate in beta testing, you can enroll here

http://prereleaseprograms-public.sharepoint.com/Pages/BusinessProfile.aspx

Change Master Page Layout (from Seattle.master to Oslo.master) in SharePoint 2013


In this post I am going to cover “How to change Master Page Layout (from Seattle.master to Oslo.master) in SharePoint 2013.


Go to Site Settings, click on “Change the Look” and then select the theme.

11

12


Now you can see “Site Layout” option on left side navigation, it allows you to pick a specific layout for your site, the default layout option is Seattle that provides “Global Navigation / Top Bar” and a “Quick Launch” side navigation to your site.

13


Change the site layout from Seattle to Oslo at left side navigation.

14


The Oslo provides left side navigation in the location of the Global Navigation and the Global Navigation is hidden. This is a perfect layout to use when you wish to have only one set of navigation and would prefer to have more white space on your site to display content.

15


Click on “Try it out” it will show the preview and then “Yes Keep it”.

16


Here is the final view of the site after applying Oslo layout (left side navigation in the location of the Global Navigation and the Global Navigation is hidden). 🙂

17

Creating a Sharepoint 2013 List from an Excel-sheet


In this post I will write about creating a SharePoint list from an excel sheet, Some time you must have come across a situation where your client or manager has an Excel sheet and wants to put it on the SharePoint as a List, We can do that using “Import SpreadSheet App” in SharePoint 2013

The steps are as follows
1. Go to Site Settings -> Add an app, and search for ‘Import Spread Sheet’ app.

1

2

3

4


2. Add ‘Import Spread Sheet’ app and provide information as shown in below screen. You need to select the excel file.

5


3. Click on the import, wait for few seconds and your spreadsheet gets imported in list.

6

Thanks for reading the blog 🙂

Hide the Quick Launch in SharePoint 2013


As we know In SharePoint 2013 the Quick Launch is mandatory but sometime it is useful to ‘turn-off’ the Quick Launch on a specific page but not on the whole site. In these cases we can use a Script Editor Web part in SharePoint 2013.


Add a Script Editor Web part on the page after clicking on Check-out
-> Edit the page -> Insert -> Script Editor Web-part
1

4

5


Now edit the Script Editor Web-part and Write the following HTML code to hide the quick launch and then Click Insert.

6

7

8

10


So now the Quick Launch will disappear and here is the final view of our page

11


Please note this is good only if you wish to hide the quick launch from one or two pages, if you want to totally remove the Quick launch on your Site then edit your master page.  By default if you haven’t done anything to your SharePoint instance the default master page will be the seattle.master.  Add your codes there and it will disable the quick launch for the whole Team Site.


I hope you find this blog helpful 🙂

Creating a Simple SharePoint 2013 app using NAPA Tool

In this post, I’ll describe about creating a simple SharePoint 2013 app using NAPA tool.
Before going through the blog, Go to the Office 365 link and create a Developer Site using Office 365 Admin Center.

1

Once you complete all the steps, click on “Build an app” link in developer site.
2

You will be redirected to the page where you can install NAPA.
3

Click on “ADD IT” button, to add NAPA on this Developer team site

4

Click on “Trust It”.
5

The NAPA app will appear in Site Contents after its installation is completed:
6

Now Open the “NAPA Office 365 Developer Tools” to build an App.
7

Click on “Add New Project” to create a new app.
8

Select “App for SharePoint” and give it a name and click on Create.
9

You will see a VS IDE like screen :
10

The code in the app consists of JavaScript client object model (JSOM). The app consists of pages, scripts, image etc. If you look at the OOB generated code for the app, you will notice there is a div which contains a paragraph element inside it. As mentioned in comments, its content will change based on the code in the app.js file. Now open the App.js file from the scripts folder and observe that the JSOM code is replacing the content of paragraph with current user name.
Now make the appropriate changes in the code, Here I am just changing the Page title to “SharePoint First App using NAPA :)”

11           12

Click on “Run Project” Icon at left hand side navigation pane.
13

Now the app will start deploying on Developer Site i.e “Kavita Testing Site”
14

Click on “Click here launch your app in a New window” link to open the app in the site
15

So here is the final view of our first SharePoint app  🙂
16
Thanks for reading the blog 🙂 🙂

Add an HTML Page as Master Page in SharePoint using Design Manager

In this post, I’ll write about adding an HTML page as Master Page in SharePoint 2013 or Office 365.
Before getting into the details, I would like to give you a brief introduction about Design Manager, most of you must have heard about it while working on SharePoint 2013 or Office 365, this is a new feature in SharePoint 2013 that makes it easier to create a fully customized design while using the web-design tools that you’re already familiar with and then upload that design into SharePoint. Design Manager is a publishing feature that is available in publishing sites in both SharePoint Server 2013 and Office 365.

1


Before we start, we need to create a HTML template( or we can download it from Google) and upload the same into Master Page Gallery.
1. Navigation for Master Page Gallery (Site Settings -> Web Designer Galleries -> Master Pages and Page Layouts)

2

3


2. Upload the HTML template into Master page gallery which you have already created.

4


3. Choose the file and click on “Upload and Publish”

5

6

7


So now we have our HTML Template in Master Page gallery. Hence we need to Convert it to a SharePoint Master Page.
1. Navigation for Design Manager (Settings -> Look and Feel -> Design Manager)

8

2. Select “Edit Master Pages” on the left hand side navigation pane.

9

3. Now Click on “Convert an HTML file to a SharePoint master page”

10

4. Select the new Uploaded HTML Page from Master Page Gallery and click on Insert button.

11

5. Once uploaded check the status as “Conversion Successful”.

12

6. Now Click on “HTML_Master_Page” link to open the Master Page Preview window.Your Preview would look like below (depends on your code in HTML template)

13

7. Go back to the Edit Master Page in Design Manager and Select the call-up menu of the new Master Page. Click on “Publish a Major version” and check its Status is “Approved”.

14

15

Now You need to open the HTML of this Master Page in a Notepad or SharePoint Designer and edit it to remove some of the unwanted text and Images so that the “Place Holder Main” (name=”ContentPlaceHolderMain”) is aligned in center.
8. Once you are done with modification, Need to Set the newly created Master Page as default for the site. so Go to “Publish and Apply Design” in Design Manager and Select “Assign master pages to your site based on device channel” and then select your new Master Page as a default Site Master Page and click OK.

16

17

Now the desired HTML Template has Converted into SharePoint Master Page 🙂 🙂

18